The NodePhone Toolbox
The NodePhone Toolbox is an easy-to-use online configuration tool for your NodePhone service. It is available here: NodePhone Toolbox.
To use the NodePhone Toolbox:
- Log in to My Internode using your Internode username and password.
(Lost your password? Click here!) - Select NodePhone Toolbox under My Services in the menu to the left of the screen.
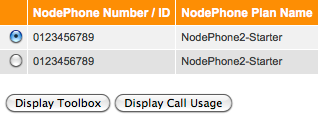
- Select the number you would like to change settings for, then click Display Toolbox.
 |
| Figure 1: Selecting your NodePhone number |
Once you have selected the number, you can access your settings via the menu at the top of the screen:
 |
| Figure 2: The NodePhone Toolbox Menu |
Each of these menu items will be explained in further detail below.
Call Feature Settings
The Call Feature Settings menu gives you control over NodePhone call handling features, such as Call Forwarding, or Anonymous Call Rejection.
Some features can also be enabled/disabled through your telephone handset. For more information, see NodePhone Handset Feature Codes.
To enable or disable features:
- Select the check-box under Enabled to turn a feature on.
- If the feature is Call Forwarding, enter the phone number you would like calls forwarded to (or select Voice Mail).
- Click Save Call Feature to save your settings.
| Call Feature | Function |
|---|---|
| Call Forward Always | Forwards calls without delay to another telephone number or Voice Mail. NOTE: Standard call charges apply for forwarded calls. |
| Call Forward Busy | Forwards calls to another telephone number in the event your phone is busy. NOTE: Standard call charges apply for forwarded calls. |
| Call Forward No Answer | Forwards calls to another telephone number in the event your phone is not answered. Will forward calls after approximately 7 rings (20 seconds). NOTE: Standard call charges apply for forwarded calls. |
| Calling Line ID Blocking (Outbound) |
Allows you to choose if your telephone number is displayed when making outbound calls. |
| Do Not Disturb (DND) | When set, your NodePhone service will appear "busy" to incoming calls. |
| Anonymous Call Rejection | Automatically rejects all calls that have withheld their number (CLID). Callers are advised that the recipient does not accept calls that withhold their CLI. |
| Call Waiting | Allows you to answer a call while already on another call. |
Call Forwarding Charges
There are no charges to enable or disable Call Forwarding. Standard call charges apply for the forwarded leg of calls, with some exceptions:
- Calls forwarded to another NodePhone number are charged at 1 cent per minute.
- There is no charge for calls forwarded to Voice Mail.
Additionally, calls cannot be forwarded to emergency services (000) or "special service" numbers such as those starting with 1800, 1300, 13, 19, etc.
Call Barring Settings
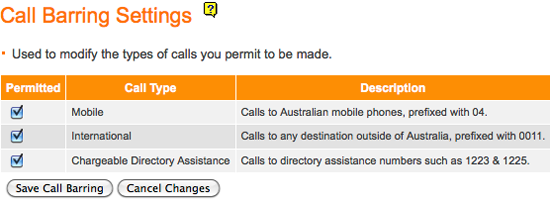
Call Barring allows you to choose which types of calls - Mobile, International, or Chargeable Directory Assistance - can be made from your NodePhone service.
To bar certain types of calls:
- Select the check-box under Permitted so that it is not ticked.
- Click Save Call Barring to save your settings.
 |
| Figure 3: NodePhone Call Barring settings |
Voice Mail
The Voice Mail screen allows you to enable or disable Voice Mail, or change your Voice Mail options. You can also reset your Voice Mail PIN here if it is forgotten.
For information on using Voice Mail via your NodePhone service, see the NodePhone Handset Feature Codes FAQ.
To change your Voice Mail settings:
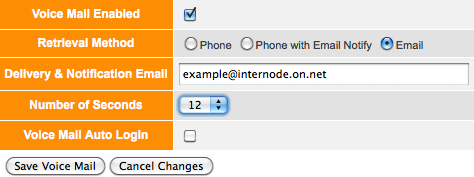
- To enable Voice Mail, make sure the check-box next to Voice Mail Enabled is selected.
- Choose how you would like to retrieve Voice Mail:
- Phone:
Allows you to retrieve all messages by dialling 111 from your NodePhone service. - Phone with Email Notify:
Sends you an email when there are messages. All messages are still retrieved by dialling 111 from your NodePhone service. - Email:
Sends you an email with your message attached in audio format (.wav).
Messages will not appear when dialling 111.
- Phone:
- If you have email notifications or email set up, enter your email address in the Delivery & Notification Email field.
- Set how long you would like the phone to ring before going to voice mail by changing the Number of Seconds.
- To enable voice mail auto-login, ensure the Voice Mail Auto Login check-box is selected.
- Click Save Voice Mail to save your settings.
 |
| Figure 4: NodePhone Voice Mail settings |
To reset your Voice Mail PIN:
- Click the Reset PIN to 123456 button at the bottom of the Voice Mail screen.
- Dial 111 to access the Voice Mail system.
- Enter 123456 when prompted for your PIN.
- Follow the voice instructions to set your new PIN.
 |
| Figure 5: Resetting your PIN to 123456 |
Password Change
The Password Change tool allows you to change your NodePhone password. You'll need to change the password setting in your NodePhone hardware if you change this password.
For more information on configuring your NodePhone hardware, see our NodePhone online guides.
Speed Dial
The Speed Dial tool allows you to store up to 100 speed dial codes (from 00 to 99). Each speed dial code has an associated telephone number and text field.
The NodePhone Toolbox also allows you to download your speed dial list in PDF or CSV (Comma Separated Values) format, and upload in CSV format format for maximum flexibility.
To add a speed dial code:
- Click the Add Entry button. A new row will appear.
- Enter the Speed Code you would like to use, for example 01.
- Enter the Phone Number you would like, including the area code.
- Enter a text Description for the speed dial - for example, "Mum".
- Click Save Entry to save your new speed dial code.
 |
| Figure 6: NodePhone Toolbox: Adding a Speed Dial Entry |
To remove a speed dial code:
- Select the radio button (round button) next to the speed dial entry you would like to delete.
- Click Delete Entry to delete the speed dial code.
To upload speed dial codes via CSV:
- Create a CSV file in your preferred spreadsheet application:
- Format: Speed Dial,Telephone Number,Description
- The Speed Dial field will accept any value between 0 and 99.
- Ensure the Telephone Number field is enclosed in either single or double quotes, as Excel will drop the leading zero when you save the file.
- The Description field is mandatory.
- If you attempt to upload a file with empty entries, it will be rejected.
- The Toolbox will treat the first row as a heading and will drop it during the upload.
- Select the Browse… button to select the CSV file from your local disk.
- Click Upload Speed Dial to upload your speed dial codes to the NodePhone Toolbox.
 |
| Figure 7: An example CSV file in Excel |
Channel Count
The Channel Count screen allows you to modify NodePhone MultiLine settings, specifically the number of concurrent calls supported by your NodePhone service. This is especially useful for IP PBX services on business premises.
By default, all NodePhone services support 2 concurrent calls. Note that a $20 charge applies each time you change your channel count (up or down), and each additional channel is charged at $10 per month, or part thereof.
View and Download Monthly Call History
You can view your NodePhone call history online, and also download your NodePhone call history as a 'Comma Separated Values' file. This is compatible with most spreadsheet and database packages such as Microsoft Excel and OpenOffice.org.
This allows you to review your own call records, and do your own calculations if you wish to.
To view and download monthly call history:
- Log in to My Internode using your Internode username and password.
(Lost your password? Click here!) - Select NodePhone Toolbox under My Services in the menu to the left of the screen.
- Select the number you would like to change settings for, then click Display Call Usage.
 |
| Figure 8: Selecting your NodePhone number |

