
WiFi Configuration for Windows computers
This guide is suitable for Windows 7, Windows Vista, and Windows XP computers.
What we'll cover:
- connecting your computer to a wireless network
Not what you're looking for? Try the Macintosh wireless connection guide.
Before you start, make sure you have the password (pre-shared key) for your wireless network. If you do not know your router's wireless password, you may be able to retrieve it from your router.
If you have a laptop computer, make sure that wireless is enabled. Some laptops have switches or function keys that turn wireless off. You will need to check your laptop's user manual, or contact the laptop's manufacturer for further information.
Windows 7
Step 1
- Locate the Wireless icon (
 or
or  ) at the bottom right of your screen.
 |
| Figure 1: Windows 7: The wireless icon as it appears in the bottom right of the screen. |
Step 2
- Click the Wireless icon to bring up the wireless properties pop up. This will show if you are currently connected to a network, and will show you any networks that are nearby.
- Select your network from the list. When you click on it, a button to Connect should appear. Click this to connect to your network.
- If NO networks are present, click the blue arrows at the top right corner of the window to refresh the list: this asks Windows to re-scan for wireless networks in your area.
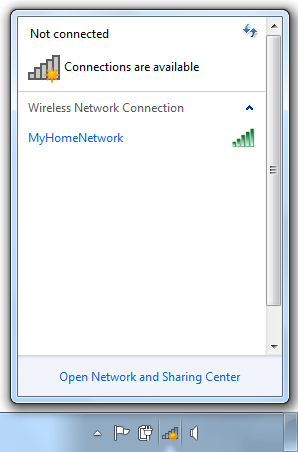 |
| Figure 2: Windows 7: The network connections pop-up, showing a nearby network. |
Step 3
- If the network has security enabled, you will be prompted for a Network security key. Enter your network's password (pre-shared key) and click OK.
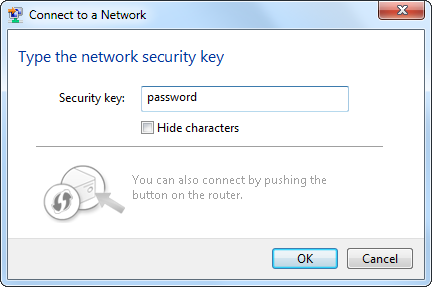 |
| Figure 3: Windows 7: Entering a network password. |
Step 4
- Windows 7 will attempt to connect to your wireless network. If successful, you may be prompted to confirm what kind of network it is, for example: a Home network, a Business Network, or a Public network:
- If this network is your personal network, select Home Network from the available options.
- If this network is at your workplace, select Work Network from the available options.
- If the network is a public network, such as in a library, cafe, or airport, select Public Network from the available options.
- Do not click Cancel on this screen as this may prevent you from being able to access your network.
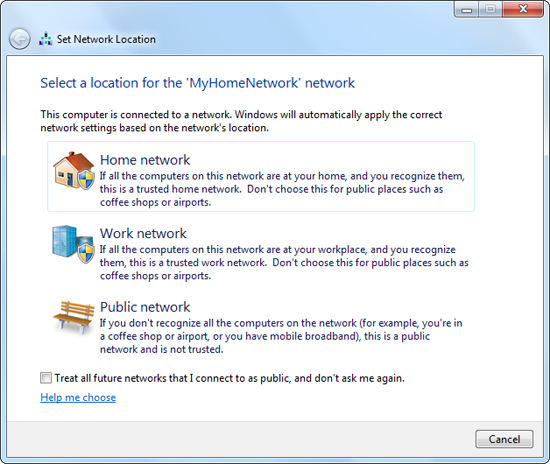 |
| Figure 4: Windows 7: Selecting a network location for a Home network. |
Step 5
- You will be asked to confirm your network settings. Click Close to complete the connection.
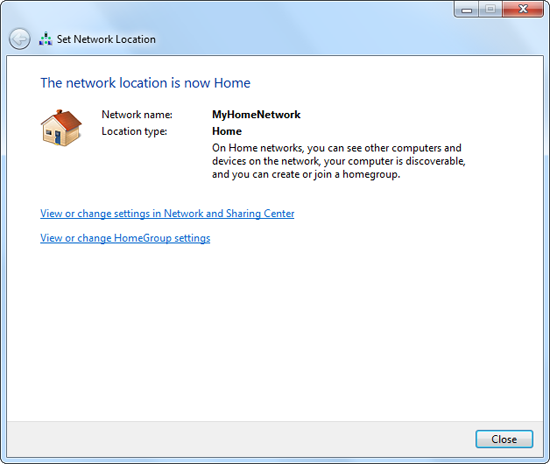 |
| Figure 5: Windows 7: Completing a wireless network connection. |
Congratulations! You have successfully connected your Windows 7 computer to your wireless network.
Windows Vista
Step 1
- Click the Start Menu (at the bottom left of your screen) and then select Control Panel.
- Select Network and Internet from the options available.
- Select Network and Sharing Centre at the top of the screen.
- In the blue-green panel to the left, select Manage Wireless Networks. This will take you to the Wireless network setup screen.
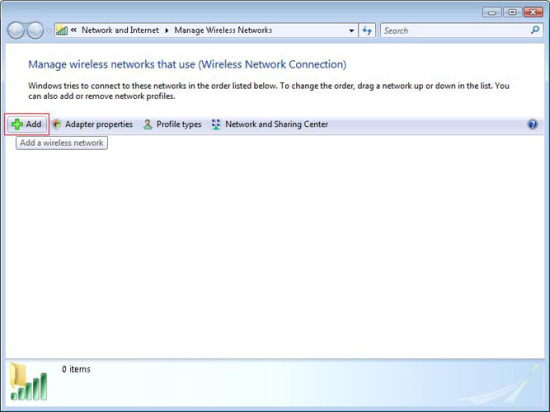 |
| Figure 6: Windows Vista's wireless connections screen. |
Step 2
- Click Add (towards the top-left of the window) to bring up the Wireless Network Wizard.
- If prompted, select Add a network that is in range of this computer.
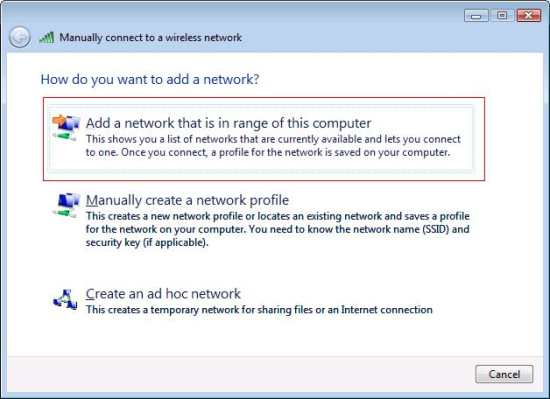 |
| Figure 7: Add a network that is in range of this computer. |
Step 3
- You should see a list of all the wireless networks that are in your local area. Select your network from the list.
- If NO networks are present, press the arrows at the top-right of the window to refresh the list: this asks Windows to re-scan for wireless networks in your area.
- To connect to your network, either double-click your network in the list or select your network and click Connect.
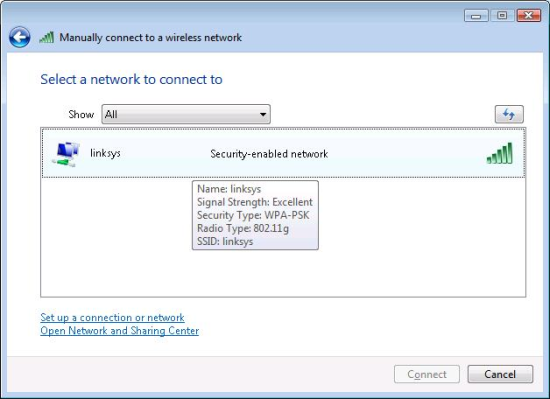 |
| Figure 8: Selecting your wireless network. |
Step 4
- If the network has security enabled, you will be prompted for a Security key or passphrase. Enter your wireless network's password (pre-shared key), and click Connect.
HINT: If you select Display characters you will be able to see the password in plain text, which may make entering the password easier.
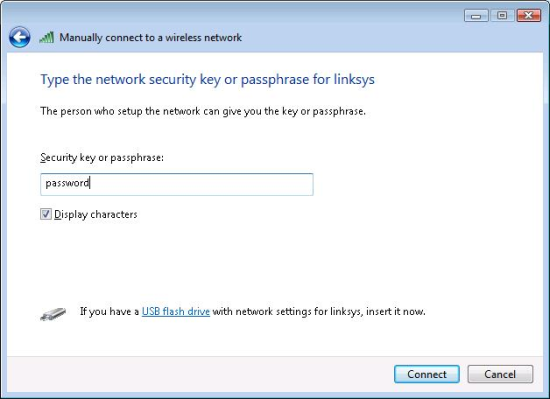 |
| Figure 9: Entering your wireless network's password (pre-shared key). |
Step 5
- Windows Vista will attempt to connect to your wireless network. If successful, Vista will ask if you want to save the network.
- Select both Save this network and Start this connection automatically, then click Close.
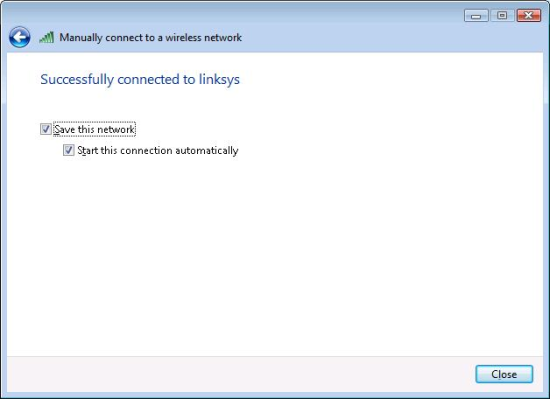 |
| Figure 10: Successful connection to a wireless network. |
Congratulations! You have successfully connected your Windows Vista computer to your wireless network.
Windows XP
Step 1
- Click the Start Menu (at the bottom left of your screen), and find Connect To in the right side.
- Select Wireless Network Connection to bring up the wireless connections.
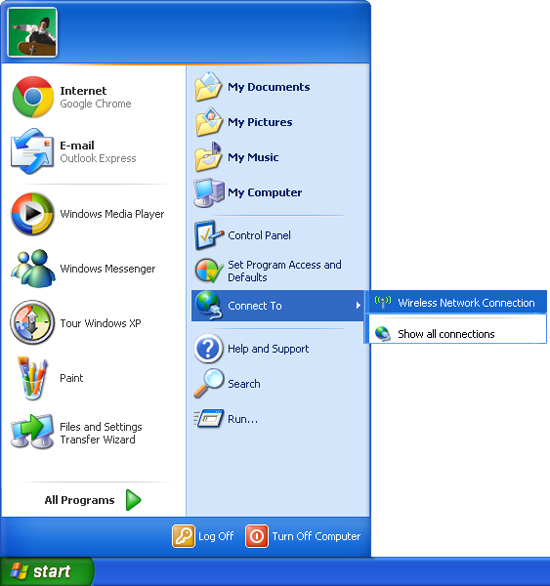 |
| Figure 11: Windows XP: Wireless Network Connection in the Start Menu |
Step 2
- The Wireless Network Connection screen will appear, and your computer will search for nearby wireless networks.
- Locate your wireless network name in the list and either double-click on it, or click on it, then click Connect.
- If no wireless networks appear, check that your laptop has wireless turned on, and then click Refresh Network List at the top left of the screen to search again.
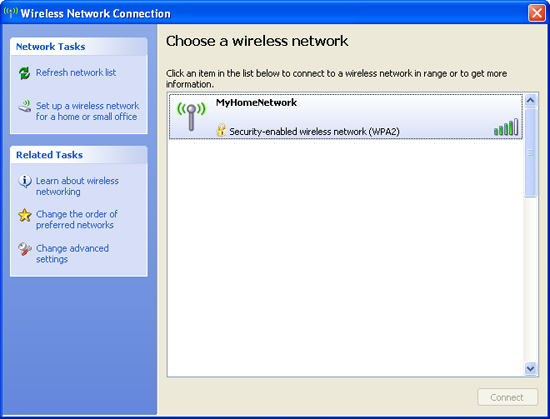 |
| Figure 12: Windows XP: A list of local wireless networks. |
Step 3
- If the network has security enabled, you will be prompted for the password. Enter your wireless network's password (pre-shared key) in the Network Key and Confirm Network Key fields, and click Connect.
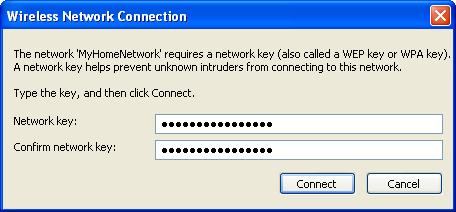 |
| Figure 13: Windows XP: Entering your network password. |
Step 4
- Windows XP will attempt to connect to your wireless network. It will first attempt to acquire a network address, and if successful, the screen will display that it has connected.
 |
| Figure 14: Windows XP: Acquiring a network address. |
 |
| Figure 15: Windows XP: Successfully connected to a network. |
Congratulations! You have successfully connected your Windows XP computer to your wireless network.
Further Assistance
If you are looking to connect your Windows computer to a wireless network, please see the following guide:
If you are having trouble setting up your router or would like to clarify some of the steps, please contact our Support Team.
 or
or  ) at the bottom right of your screen.


